

Prerequisites
- A Salesforce org on Lightning Experience (Developer, Professional with API access, Enterprise, or Unlimited edition)
- Permission to install apps and edit Lightning record pages (System Administrator or equivalent)
- A DNCScrub account with API access — your Login ID (API key) and, optionally, a Campaign ID
Step 1: Install the App
Install the CCC DNCScrub managed package using the link that matches your org. You must be logged in to the target org before opening the link. Production:https://login.salesforce.com/packaging/installPackage.apexp?p0=04thm000002JWSrAAO
Sandbox:https://test.salesforce.com/packaging/installPackage.apexp?p0=04thm000002JWSrAAO
Specific Org: replace <theirdomain> with your org’s My Domain.https://<theirdomain>.sandbox.my.salesforce.com/packaging/installPackage.apexp?p0=04thm000002JWSrAAO
1
Open the install URL
Copy the install URL for your org type above and open it in your browser. Salesforce will confirm the components being added.
2
Choose who to install for
Select Install for All Users (or the scope that fits your rollout).
3
Approve access
During install, Salesforce shows a “Yes, grant access to these third-party web sites” checkbox listing the DNCScrub API endpoints. Check it to approve. You do not need to add these URLs manually — the package includes them as active Remote Site Settings and creates them for you on install.
Each org is configured separately — including sandboxes. Installing the package does not carry over configuration between environments. In every org you install into, repeat Step 2 to enter your Login ID / Campaign ID and Step 3 to assign the permission sets. If you’re testing against a sandbox, confirm the Login ID you enter is valid for the environment you’re pointing at.
Step 2: Connect Your DNCScrub Account
After installing, open the CCC DNCScrub app from the App Launcher and go to the Settings tab to enter your DNCScrub credentials. These settings apply org-wide to every scrub operation.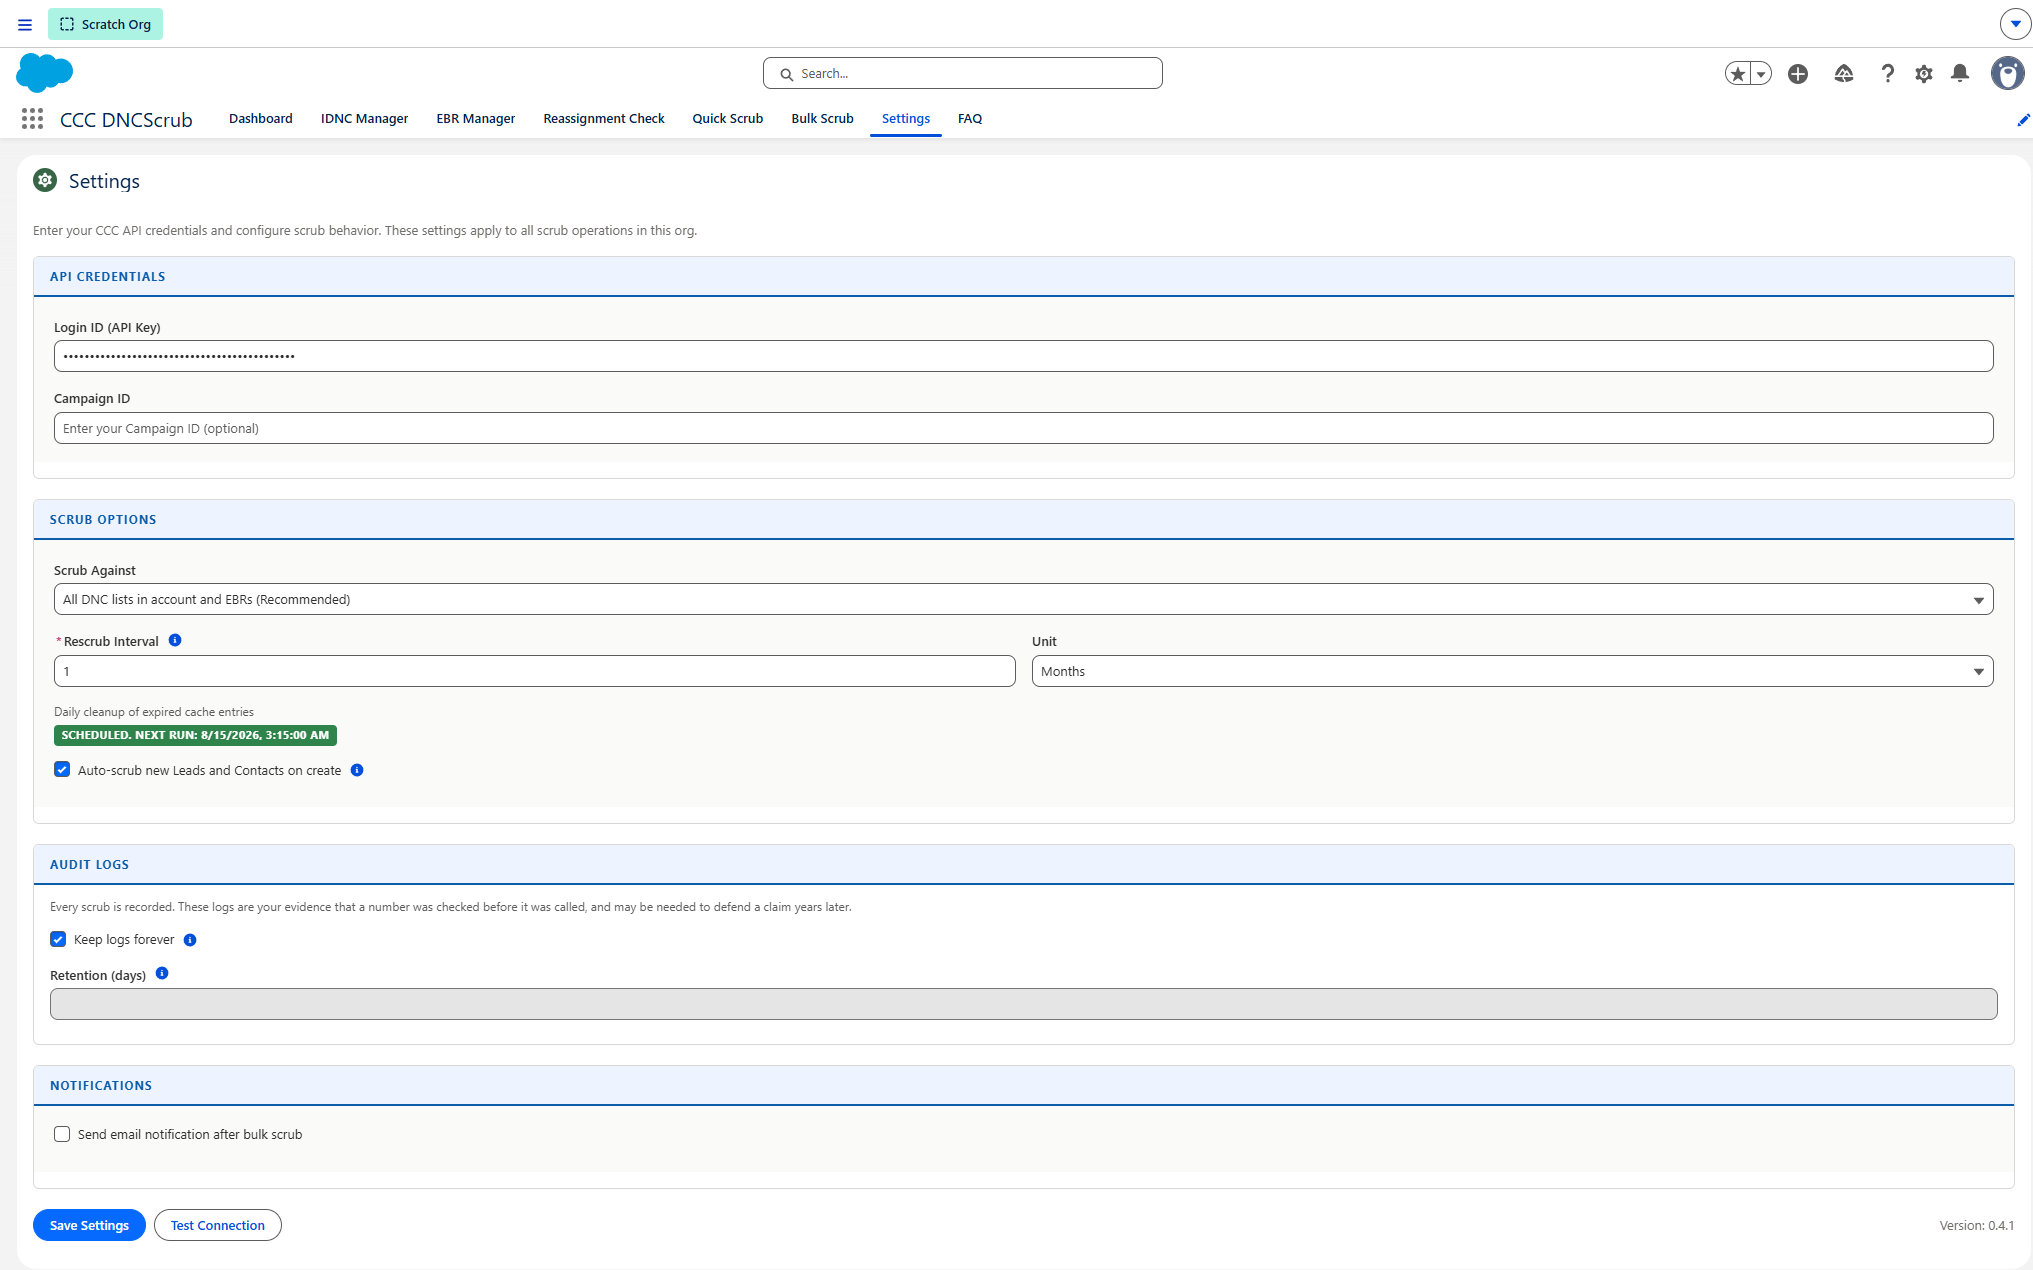
1
Enter your credentials
Under API credentials, enter:
- Login ID (API Key) — your DNCScrub API key
- Campaign ID — the DNCScrub campaign used to scrub (optional)
2
Test the connection
Select Test Connection to verify your Login ID works against the DNCScrub API.
3
Set scrub behavior
Configure the Scrub Options:
- Scrub Against — which lists to screen numbers against
- Rescrub Interval and Unit — how long a scrub result stays valid before the number is sent to the API again. Enter a number and choose Hours, Days, or Months. Months and days use calendar arithmetic, so
1 Monthmeans one calendar month rather than 720 hours.0re-checks every time. - Auto-scrub new Leads and Contacts on create — scrubs a record automatically as soon as it is created with a phone number.
4
Set audit log retention
Under Audit Logs, leave Keep logs forever selected unless you have a retention policy that says otherwise. These logs are your evidence that a number was checked before it was called, and may be needed to defend a claim years later. Clearing the checkbox reveals a Retention (days) field, which accepts a minimum of 1500 days — a little over the four-year window in which a TCPA claim can be brought.
5
Save
Select Save Settings.
Check the version first when something looks wrong. The installed version is shown at the bottom right of the Settings page — for example Version: 0.4.1. After an upgrade, a browser may keep running the previous version’s components until you hard-refresh (Ctrl+Shift+R, or Cmd+Shift+R on a Mac). If the version shown is the new one but the app still behaves like the old one, it is the browser cache; if the version shown is the old one, the upgrade did not reach that org.
Daily cleanup job
Under Scrub Options, the Settings page reports whether the daily cleanup job is scheduled and when it next runs. The job removes expired entries from the scrub cache (and old audit logs, if you have set a retention period). If it shows Not scheduled, select Schedule now. Orgs that received the app by package install normally have it already; orgs set up by a direct metadata deployment do not, because deployments do not run install scripts.Dashboard
Once connected, the Dashboard tab is your home base — an at-a-glance view of scrubbing activity (Do Not Call scrubs today and this week, Do Not Call numbers identified today, and reassigned checks today), along with an embedded Quick Scrub and a Recent Activity log.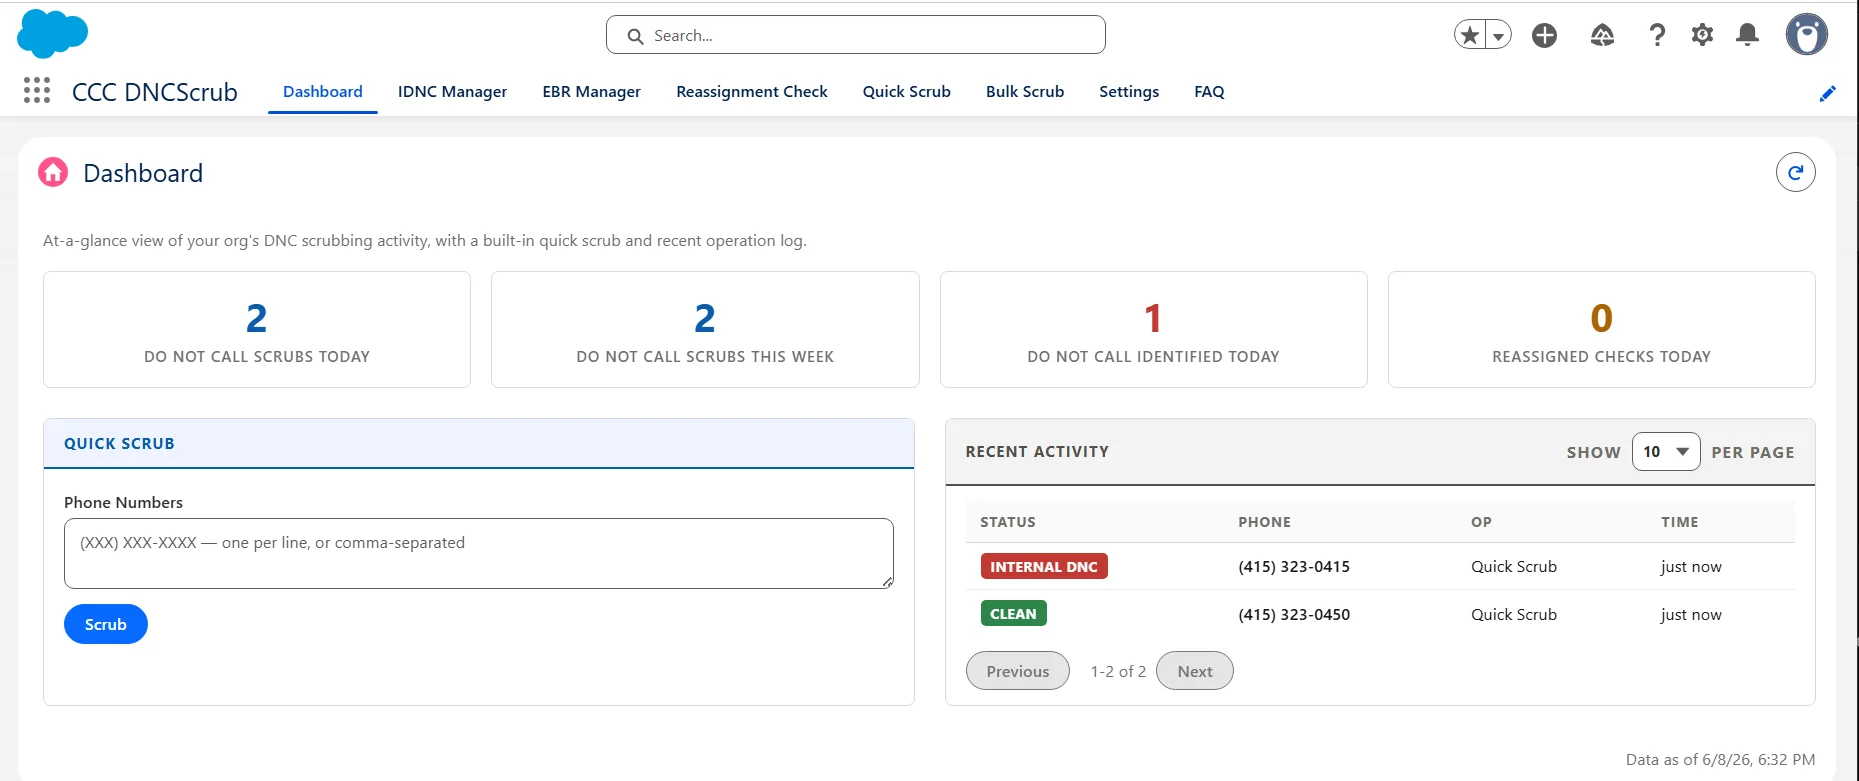
Step 3: Assign Permission Sets
The app ships with two permission sets. Assign them to your users from Setup → Permission Sets.Step 4: Add the Scrub Panel to Record Pages
The CCC DNC Scrub Panel is a Lightning component you place on Lead, Contact, Account, or Campaign Member record pages.1
Edit the record page
On a record, select the gear icon → Edit Page to open Lightning App Builder.
2
Drag in the Scrub Panel
Drag the CCC DNC Scrub Panel component onto the page (the sidebar works well).
3
Configure the phone fields
Set the Phone Fields to Scrub property to a comma-separated list of field API names — for example
Phone,MobilePhone,HomePhone. Each field is scrubbed and displayed independently.4
Activate the page
Save and Activate the page for the relevant app, record type, or profile.
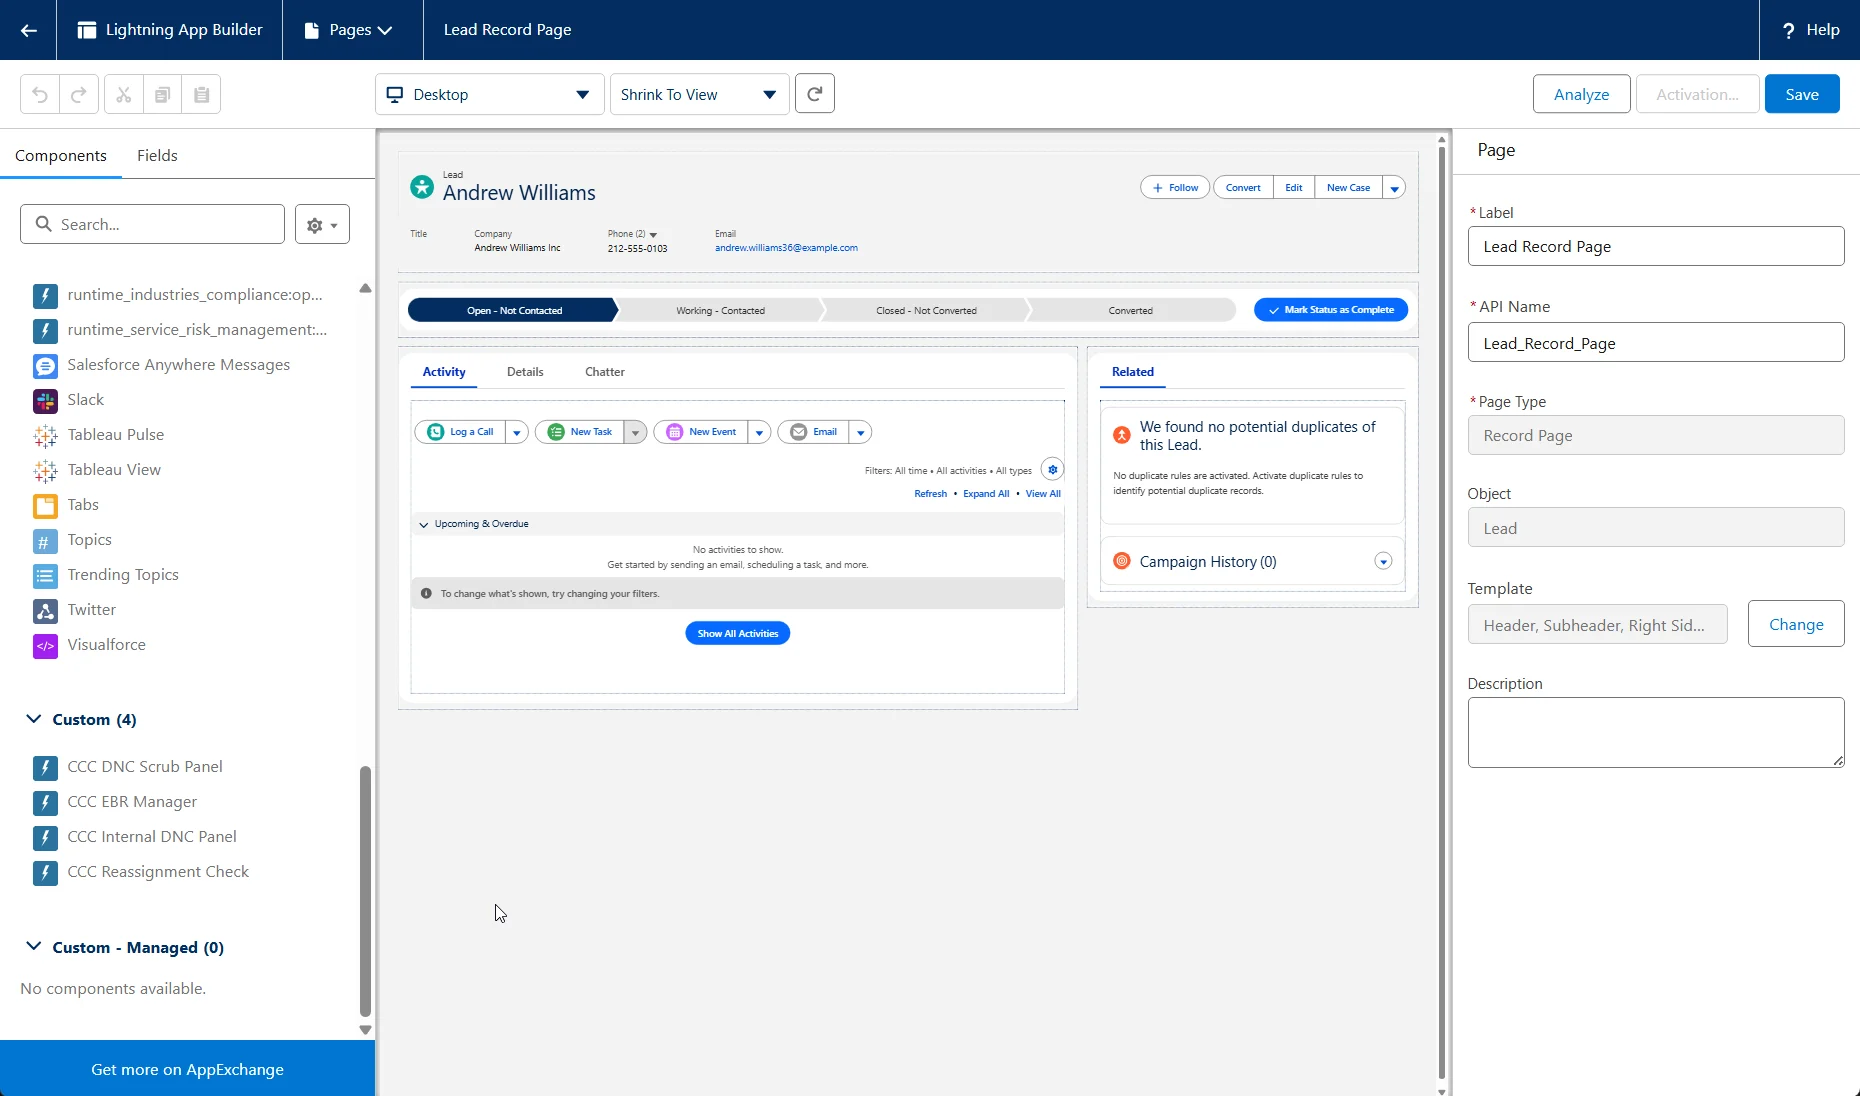
The CCC components appear under Custom in the Lightning App Builder palette.
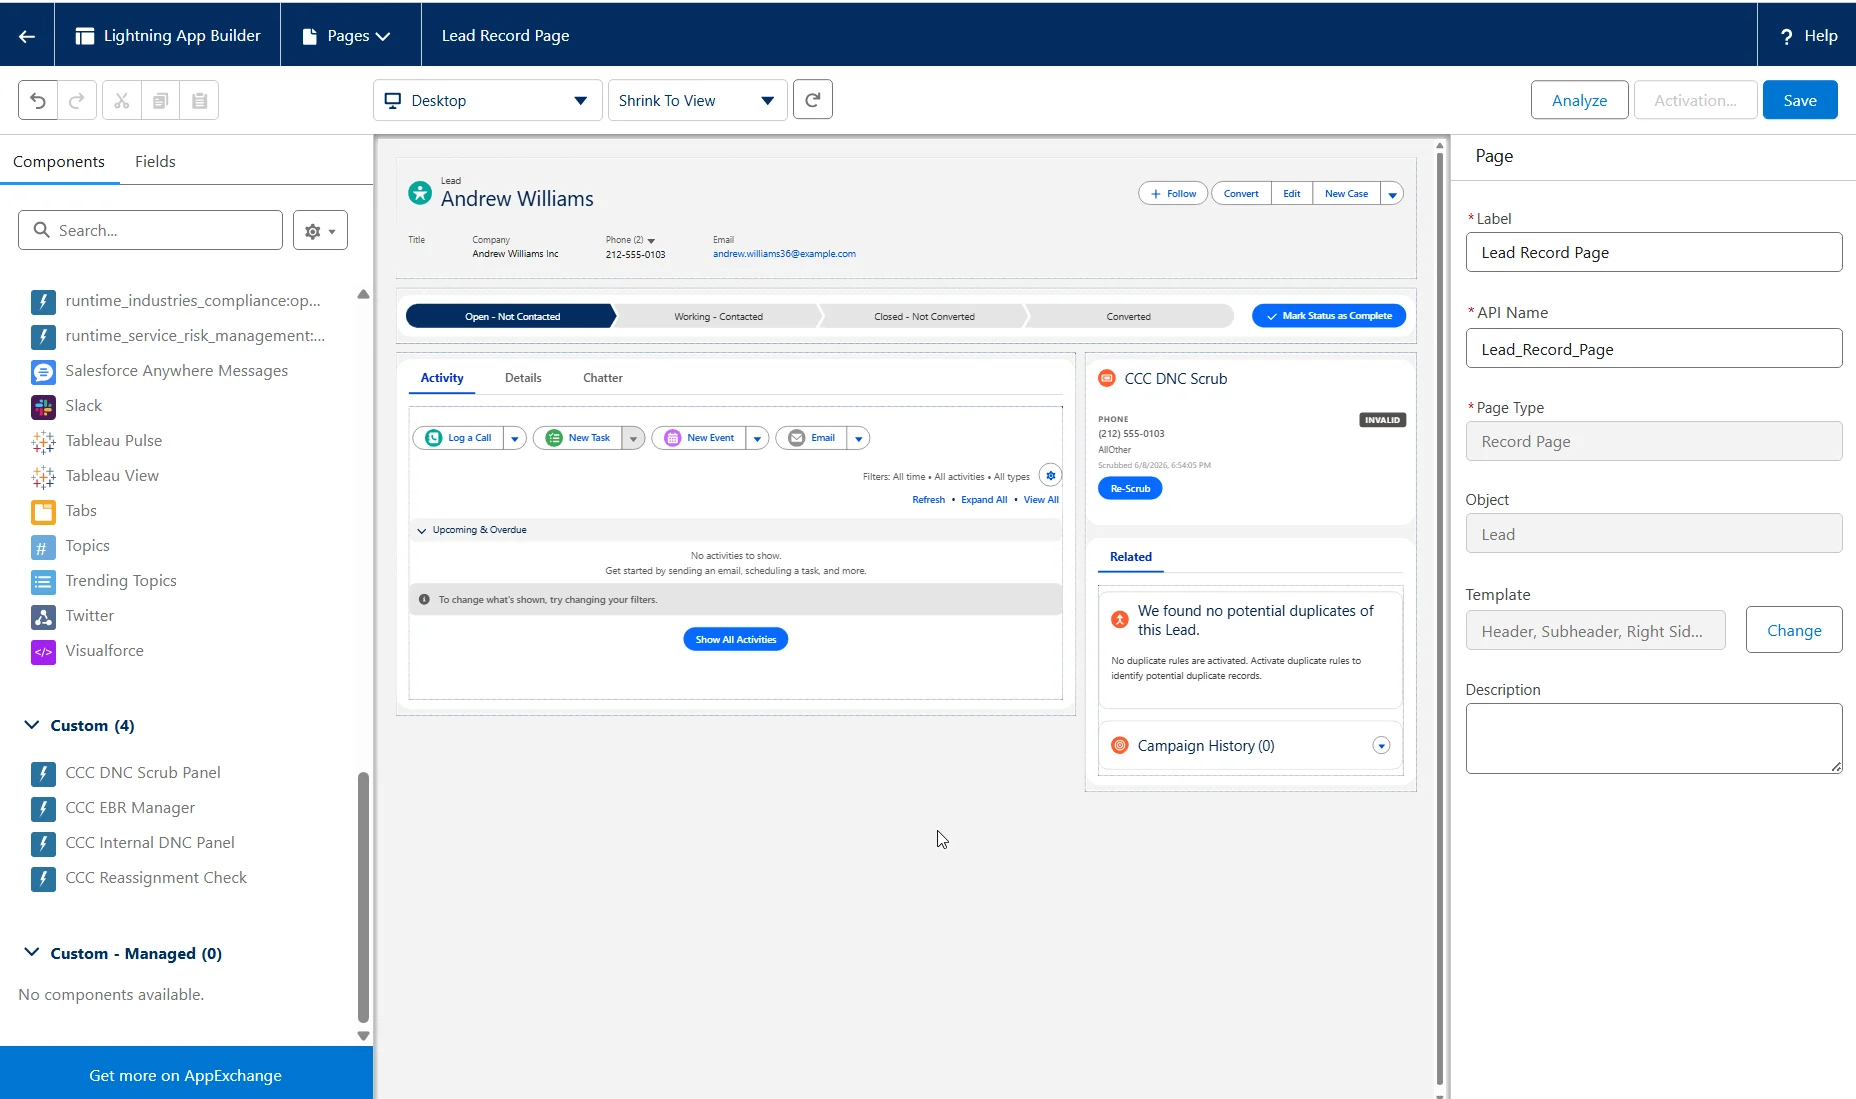
The CCC DNC Scrub Panel placed on the record page in App Builder.
Scrub Panel properties
Scrubbing a Record
When the Scrub Panel loads, it automatically checks every configured phone field (unless auto-scrub is disabled). If a number was scrubbed within the rescrub interval, the cached result is shown without a new API call; otherwise a fresh check runs. Each phone field renders as its own card with a status badge, line type, carrier, region, and a Re-Scrub button. Click Re-Scrub at any time to force a fresh check.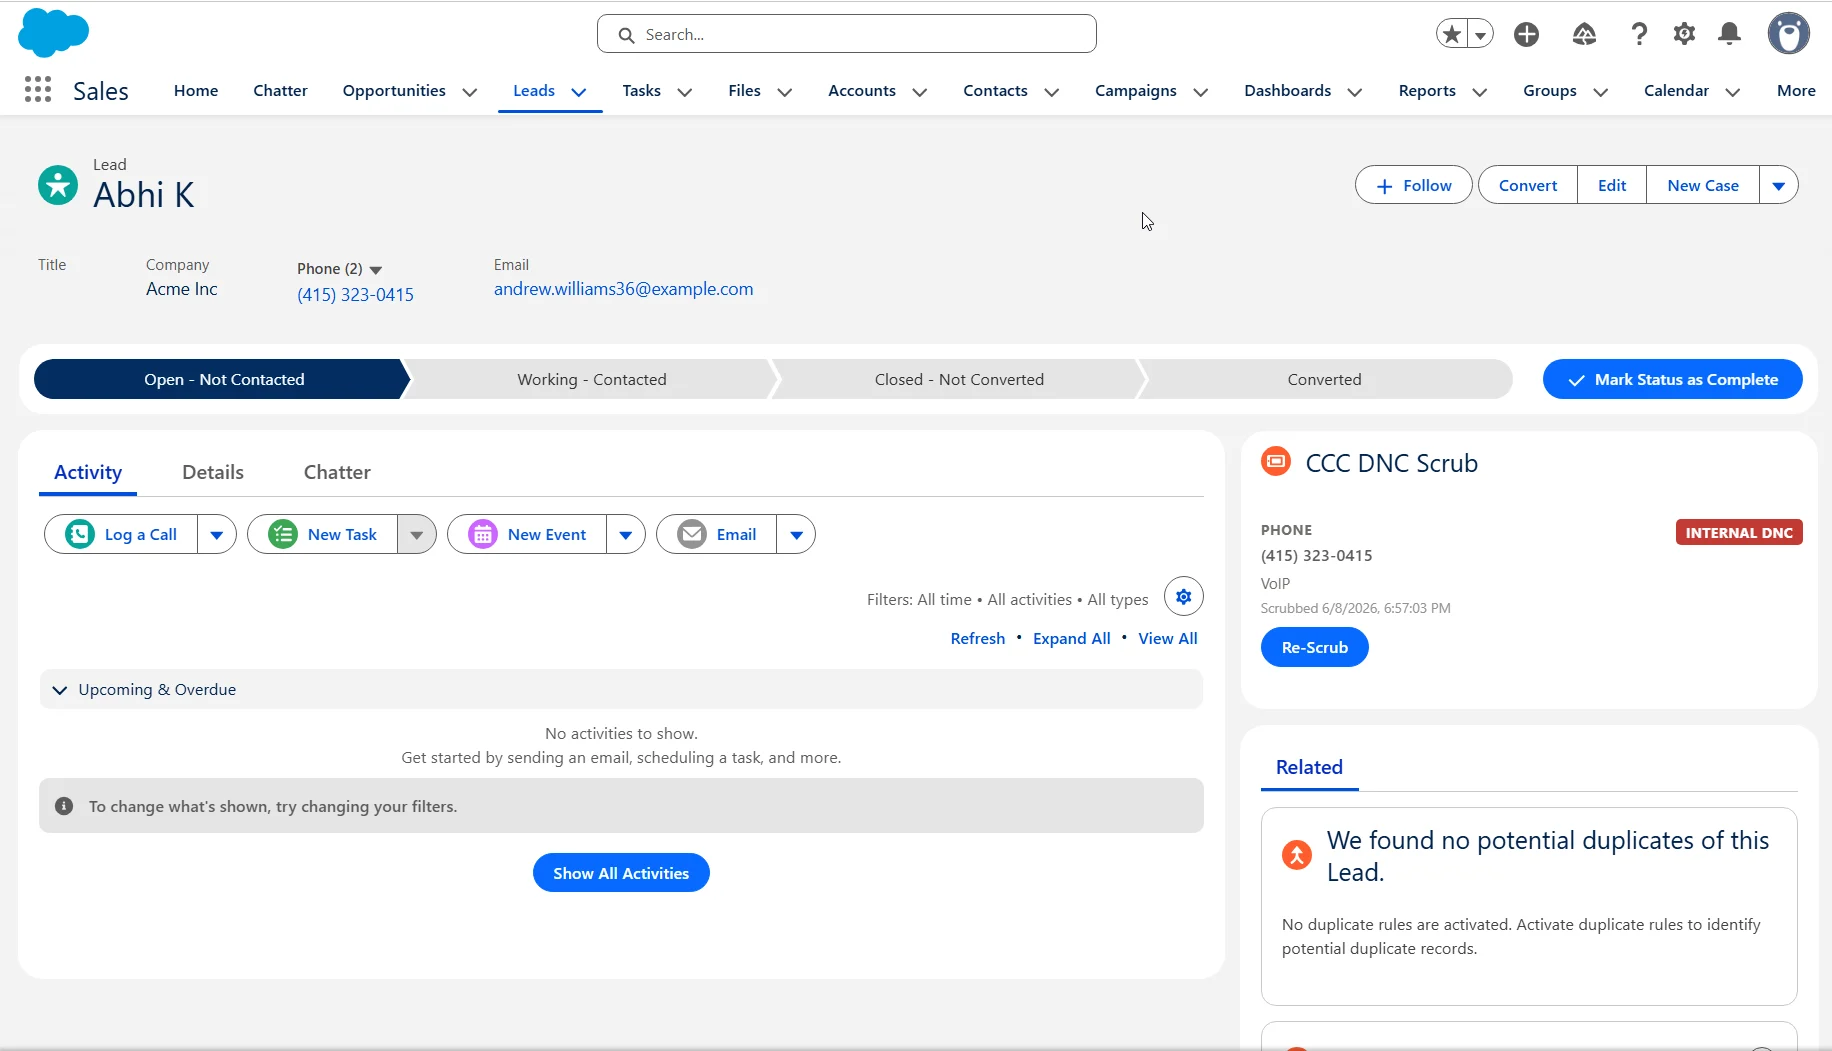
Phone is Clean but MobilePhone is Do Not Call, the record shows Do Not Call.
Reading the result codes
Each phone number receives a result code. Codes marked Callable: Yes are considered safe to call.Scrub result codes
These codes are returned by the DNCScrub scrub API and apply to every full scrub.
For full definitions of every code, see the scrub output guide.
Litigator-only mode codes
When the org is configured for litigator-only screening, the app calls the DNCScrub Litigator API instead of the Full Scrub API. That API returns a simple true/false, which the Salesforce app maps to its own two codes so results render in the same UI.Quick Scrub
The Quick Scrub tab (also embedded in the Dashboard) is for ad-hoc checks. Paste one or more phone numbers — comma or newline separated — and get immediate results split into callable and non-callable groups. Quick Scrub does not require a Salesforce record and does not save results to any record.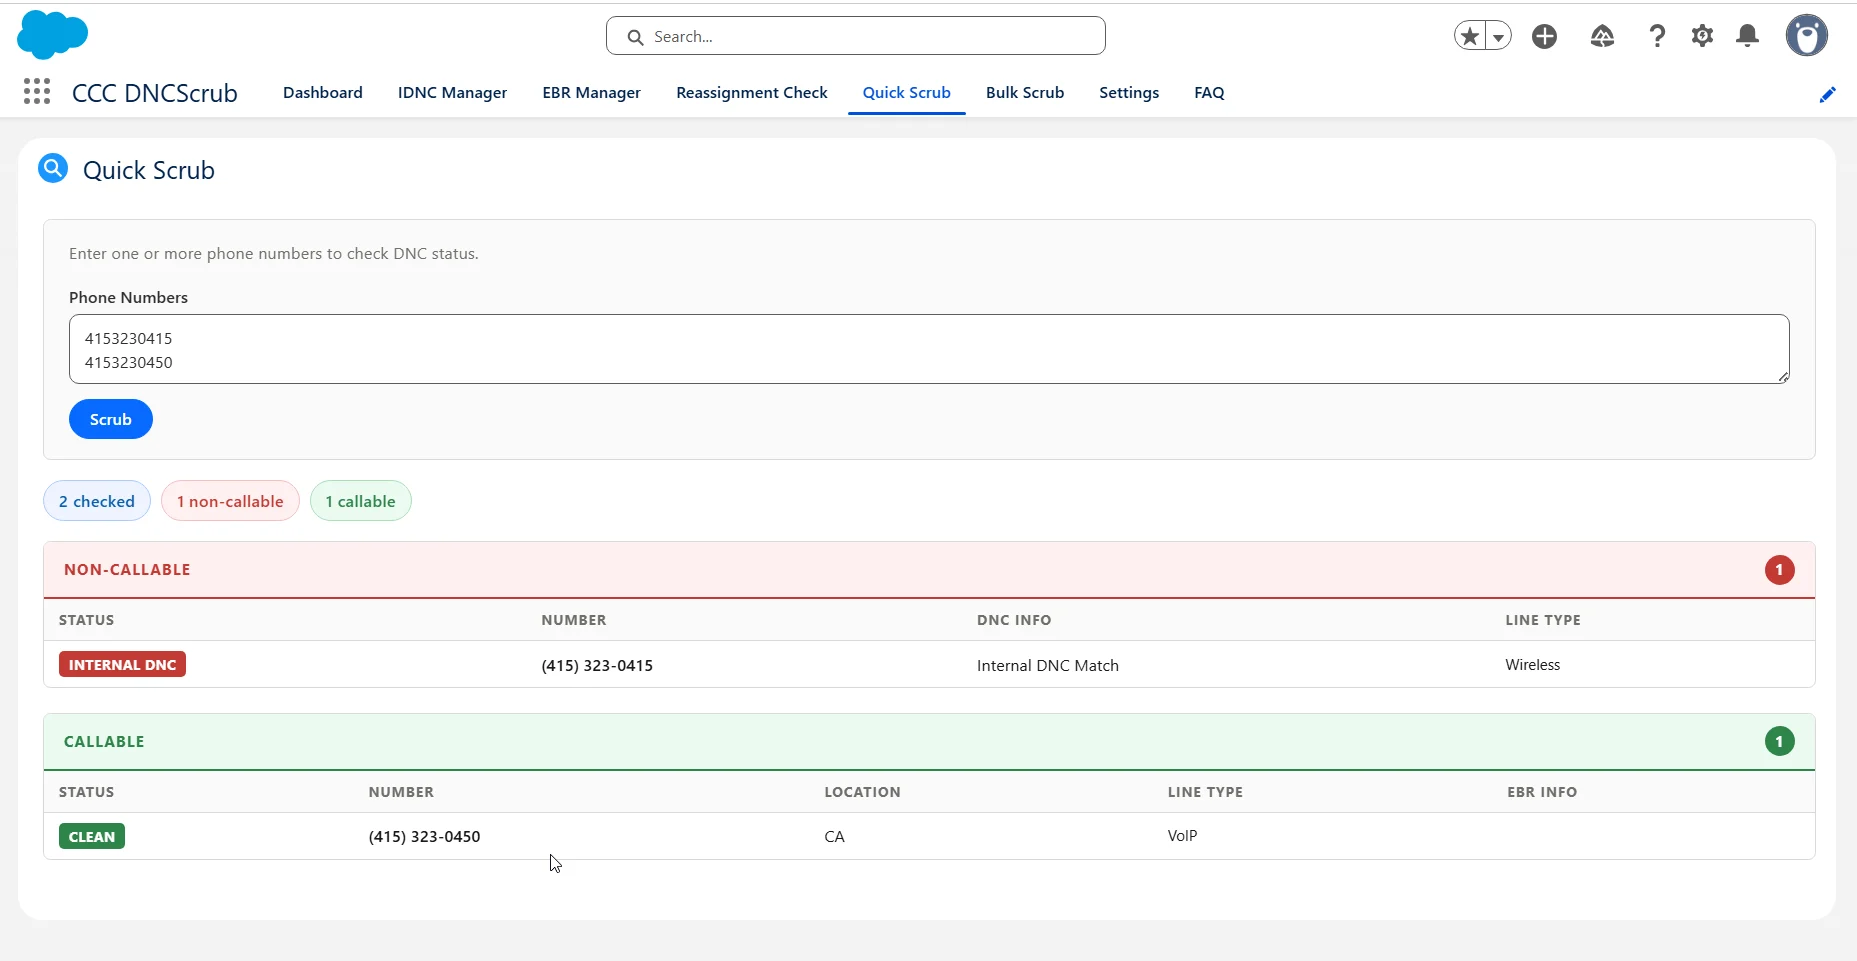
Internal DNC (IDNC) Management
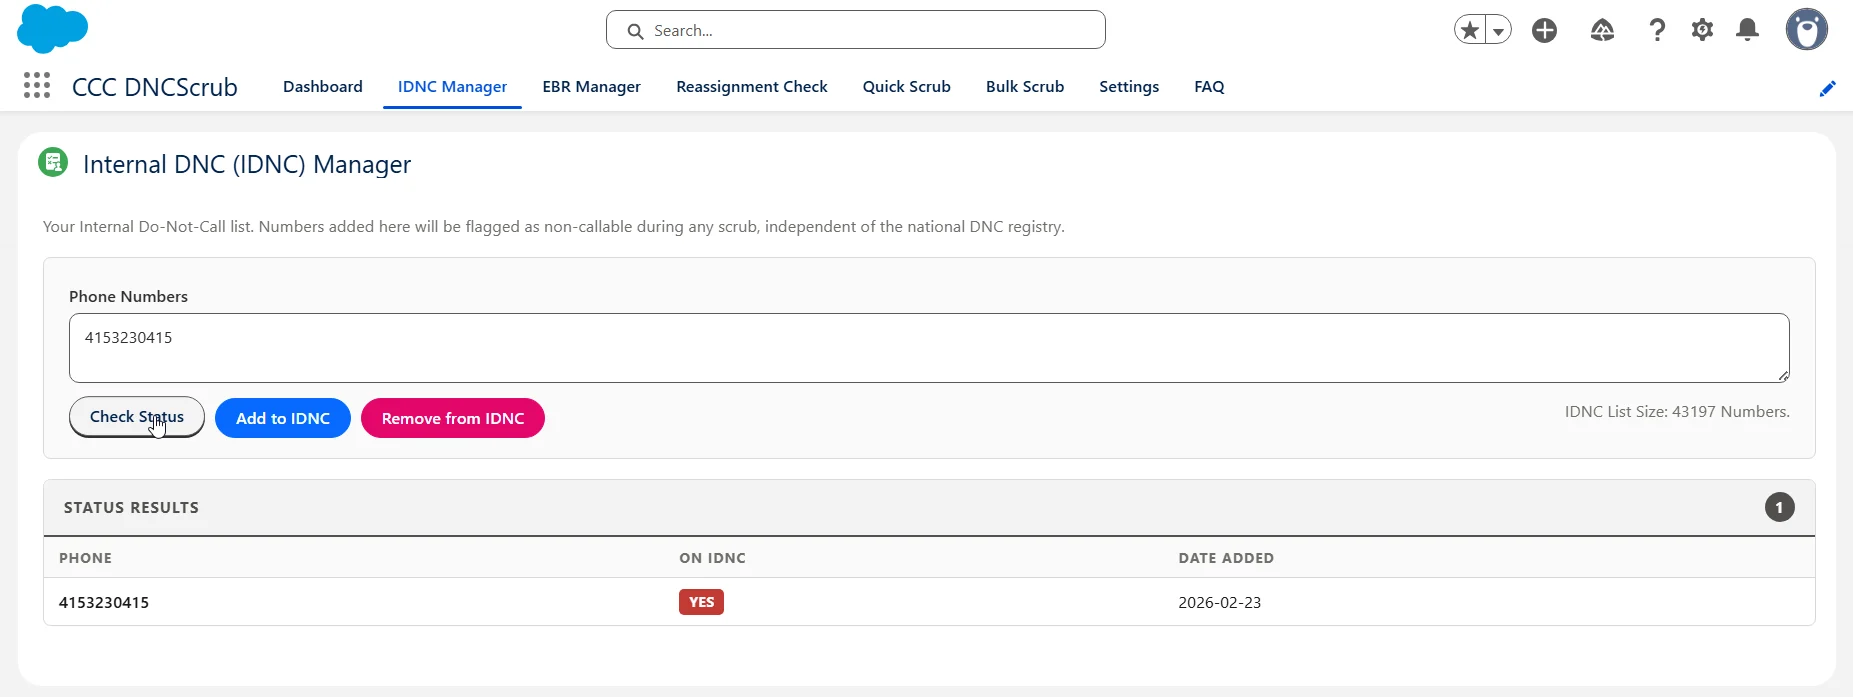
Your Internal DNC list is your organization’s private do-not-call list, separate from the national registry. Use it when a customer requests not to be called, you receive a written opt-out, or you need to block numbers beyond federal/state lists. Manage it from the IDNC Manager tab — or the IDNC panel on a record page. Enter one or more numbers and use Check Status, Add to IDNC, or Remove from IDNC. Numbers on the IDNC return result codeP (Internal DNC) and are marked non-callable in all future scrubs.
EBR Management
An Existing Business Relationship (EBR) is a legal exemption that can let you call a DNC-listed number. From the EBR Manager tab, use Add EBR to record a relationship for a number (EBR type, date, optional reference and brand), and Check EBR to see which numbers already have one on file.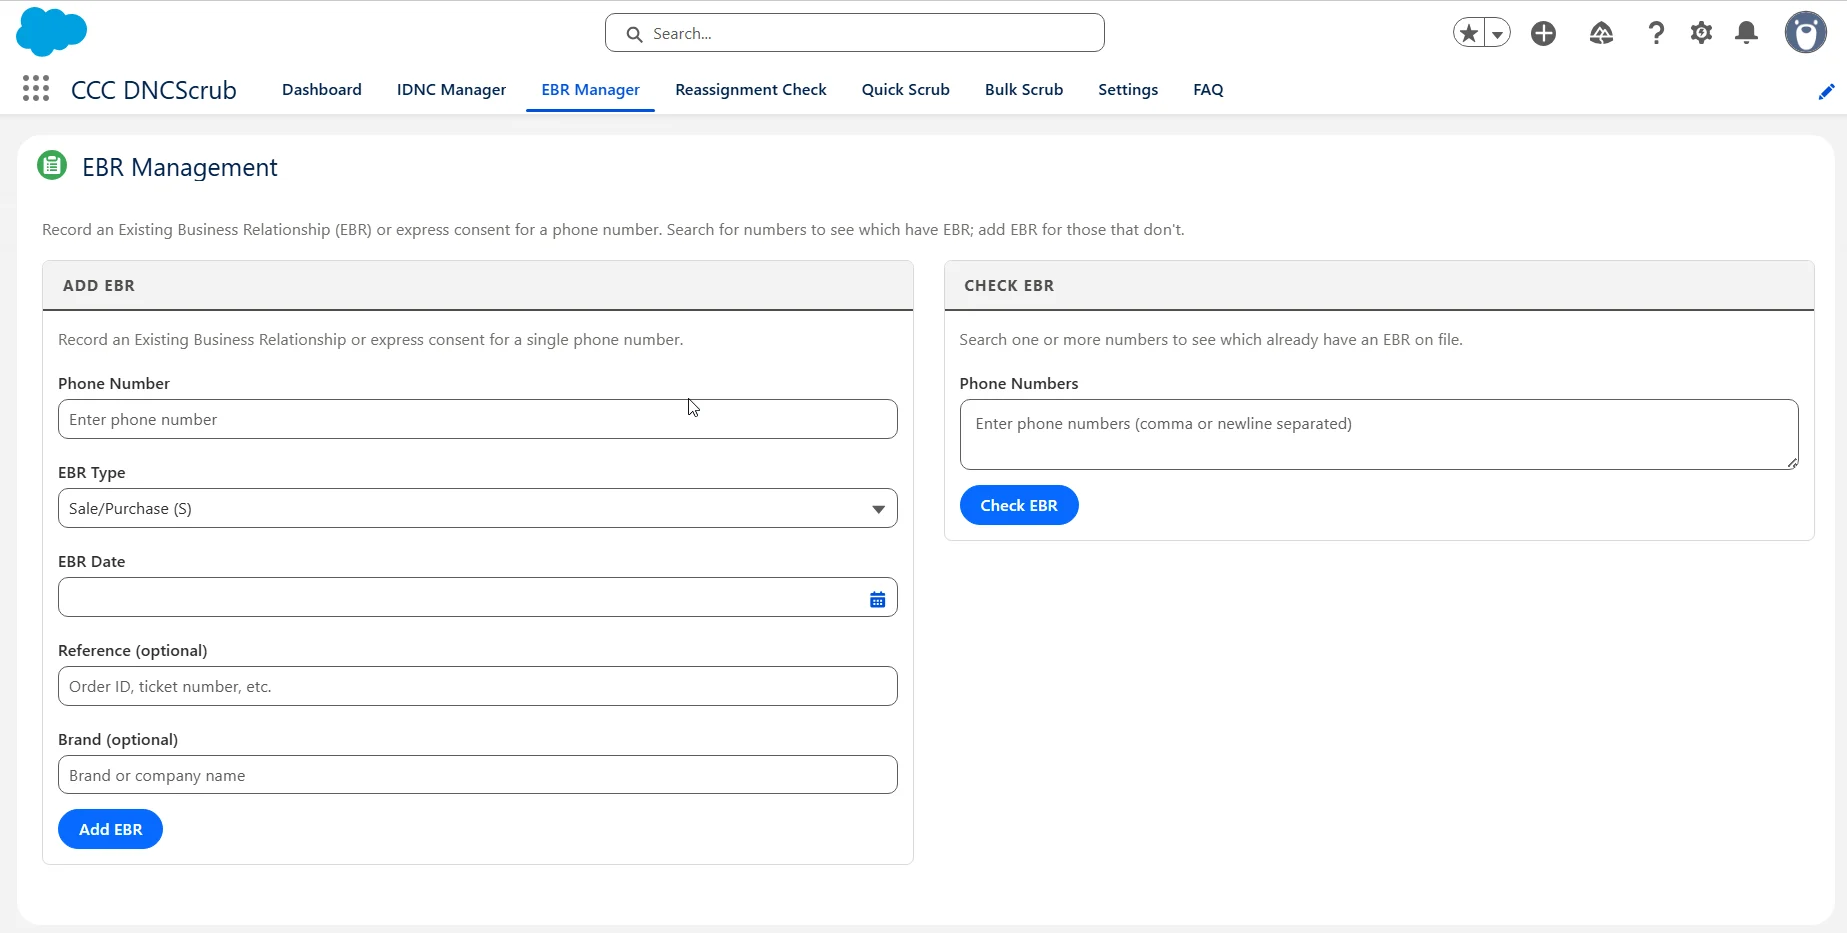
When an EBR is active, the scrub returns codes
E, F, G, H, or O instead of D, indicating the number is callable under the exemption.
Reassignment Check (Authority+)
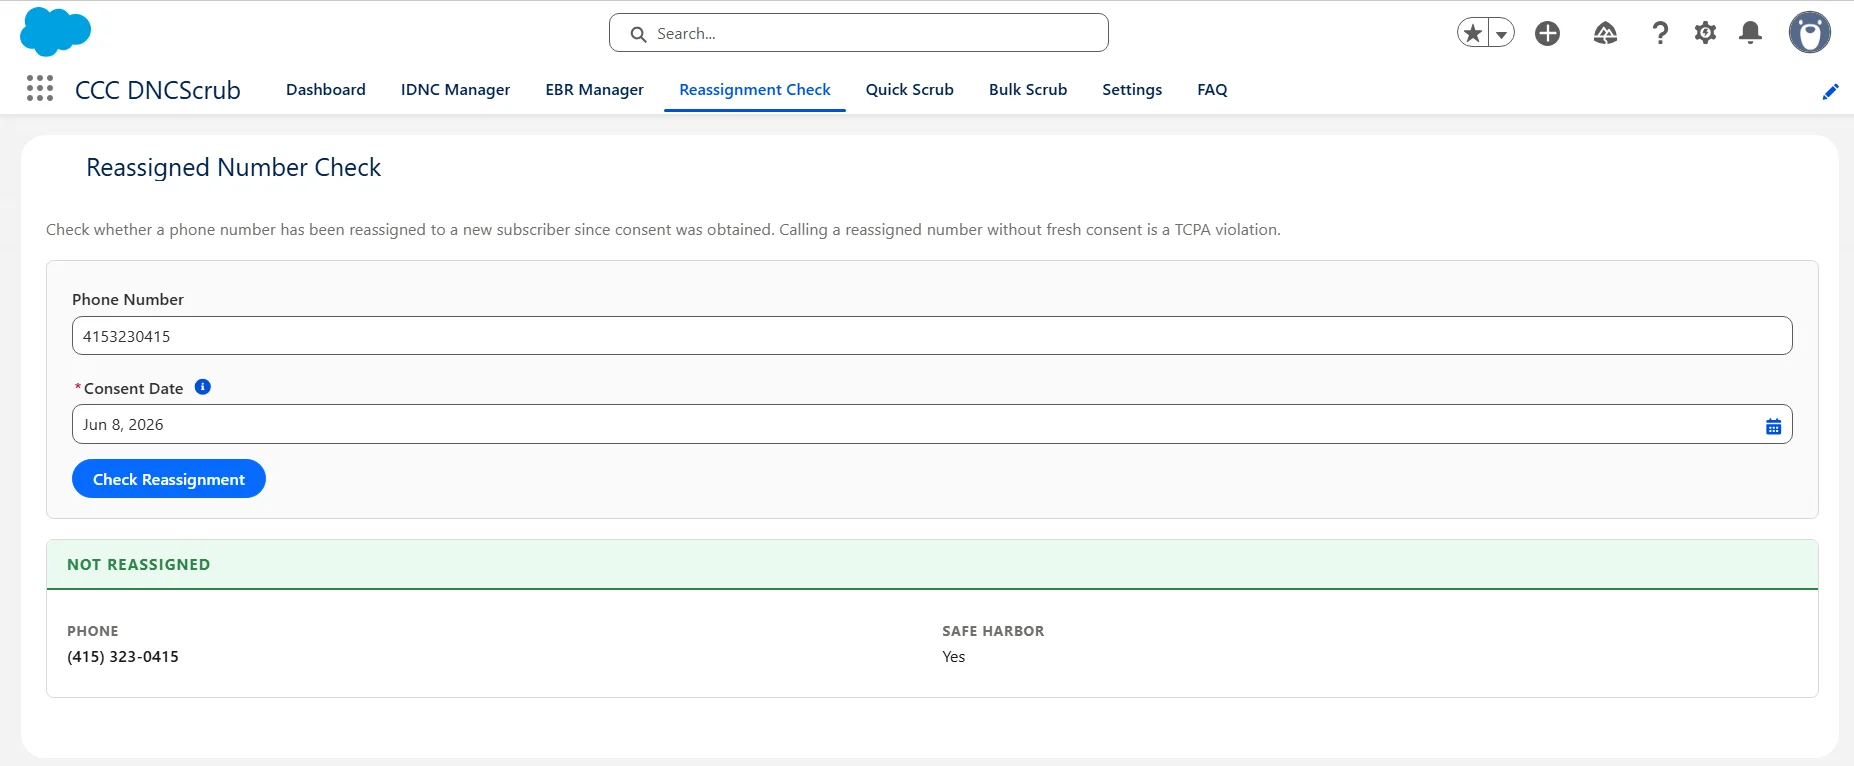
Under the TCPA, calling a number that was reassigned to a new subscriber after you obtained consent can create legal liability. The Reassignment Check tab (Authority+) verifies whether a number still belongs to the original subscriber.1
Enter the number and consent date
Provide the Phone Number and the Consent Date — when the customer originally agreed to be contacted.
2
Check reassignment
Select Check Reassignment. The system checks whether the number changed hands after the consent date.
3
Review Safe Harbor
If Safe Harbor is Yes, you have TCPA safe harbor protection — the reassignment database confirms the number had not been reassigned at the time of the call.
Bulk Scrub and Scheduling
The Bulk Scrub tab scrubs records in batches and can run on a schedule.1
Create a schedule
Select New Schedule and choose the object — Lead, Contact, Account, or Campaign Member — and the phone fields to scrub.
2
Set the frequency
Choose how often it runs:
- One Time — runs once on a specific date
- Daily — runs every day at a set time
- Weekly — runs on selected days of the week
- Monthly — runs on a specific day of the month
3
Optionally filter records
Add filters to target specific records (for example, only Leads with Status = Hot). The record-count preview shows how many records will be processed before you save.
4
Optionally save the result code to a field
Save Result Code To copies the raw result code (
C, D, P, and so on) onto a field of your choice on each record, which is useful if you already report on an existing column.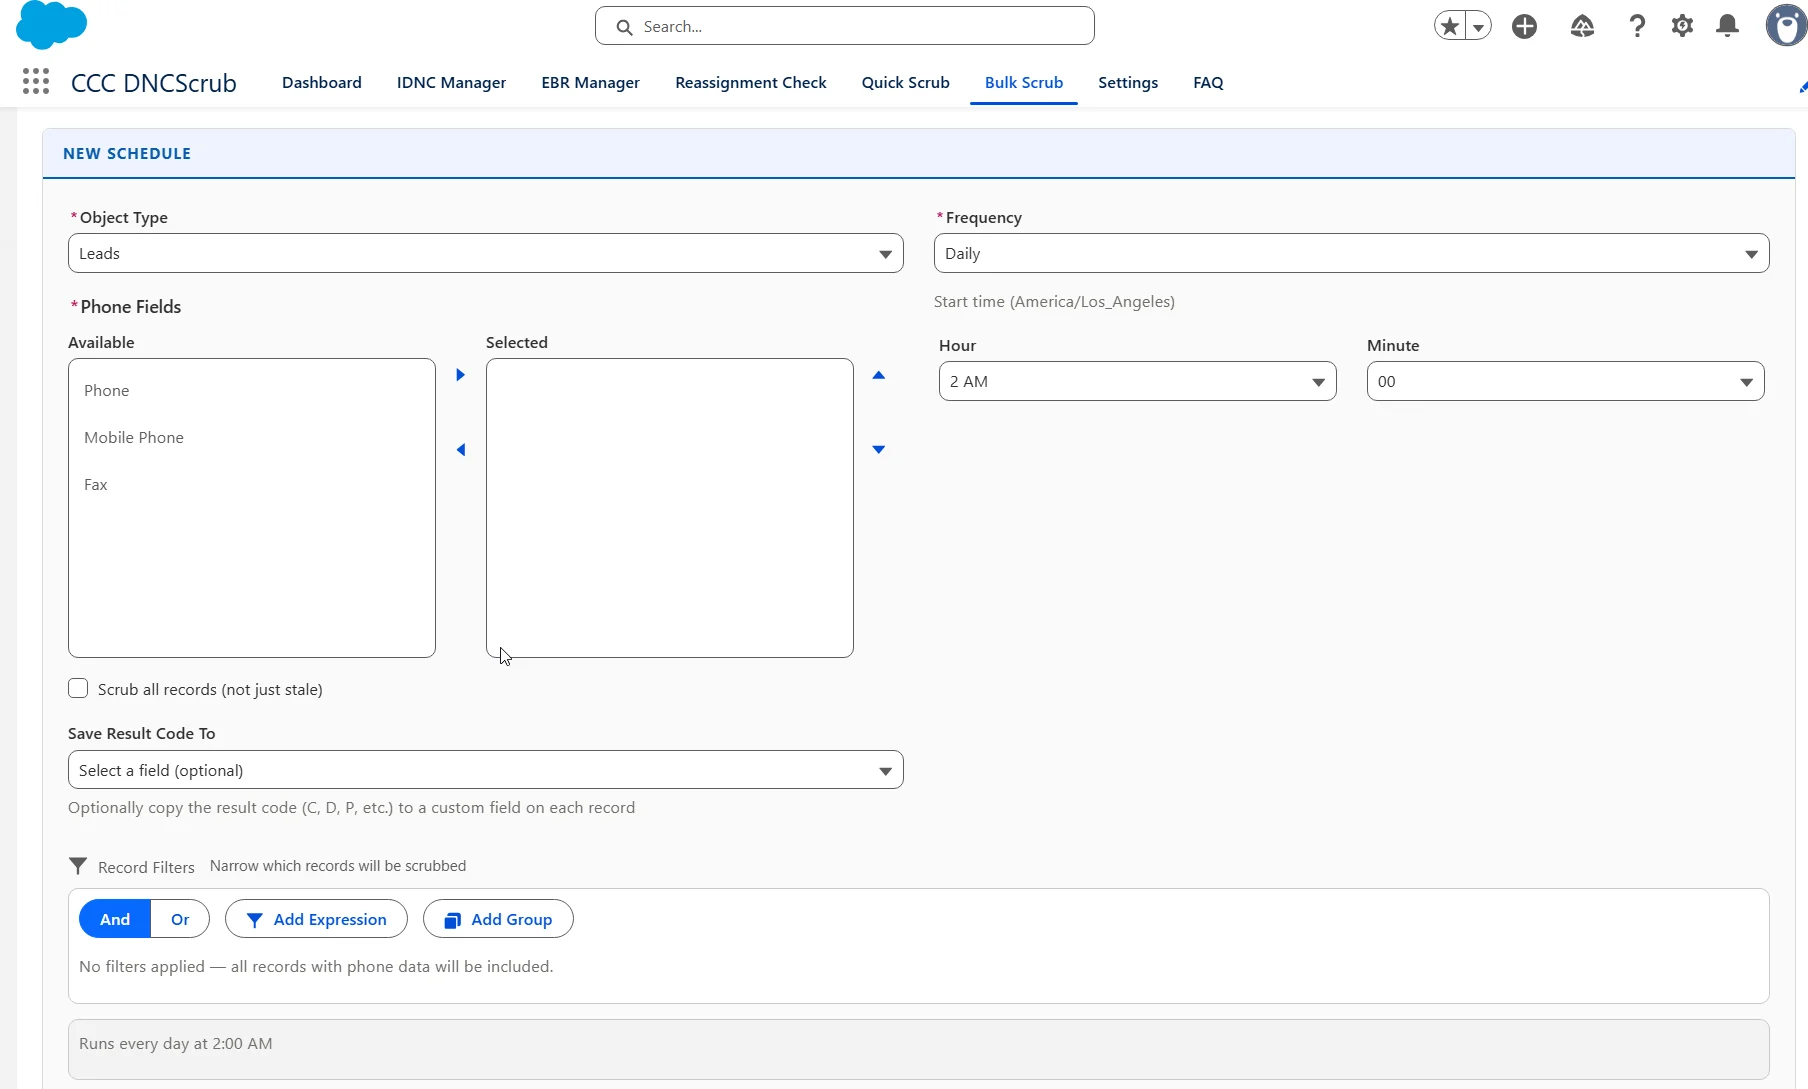
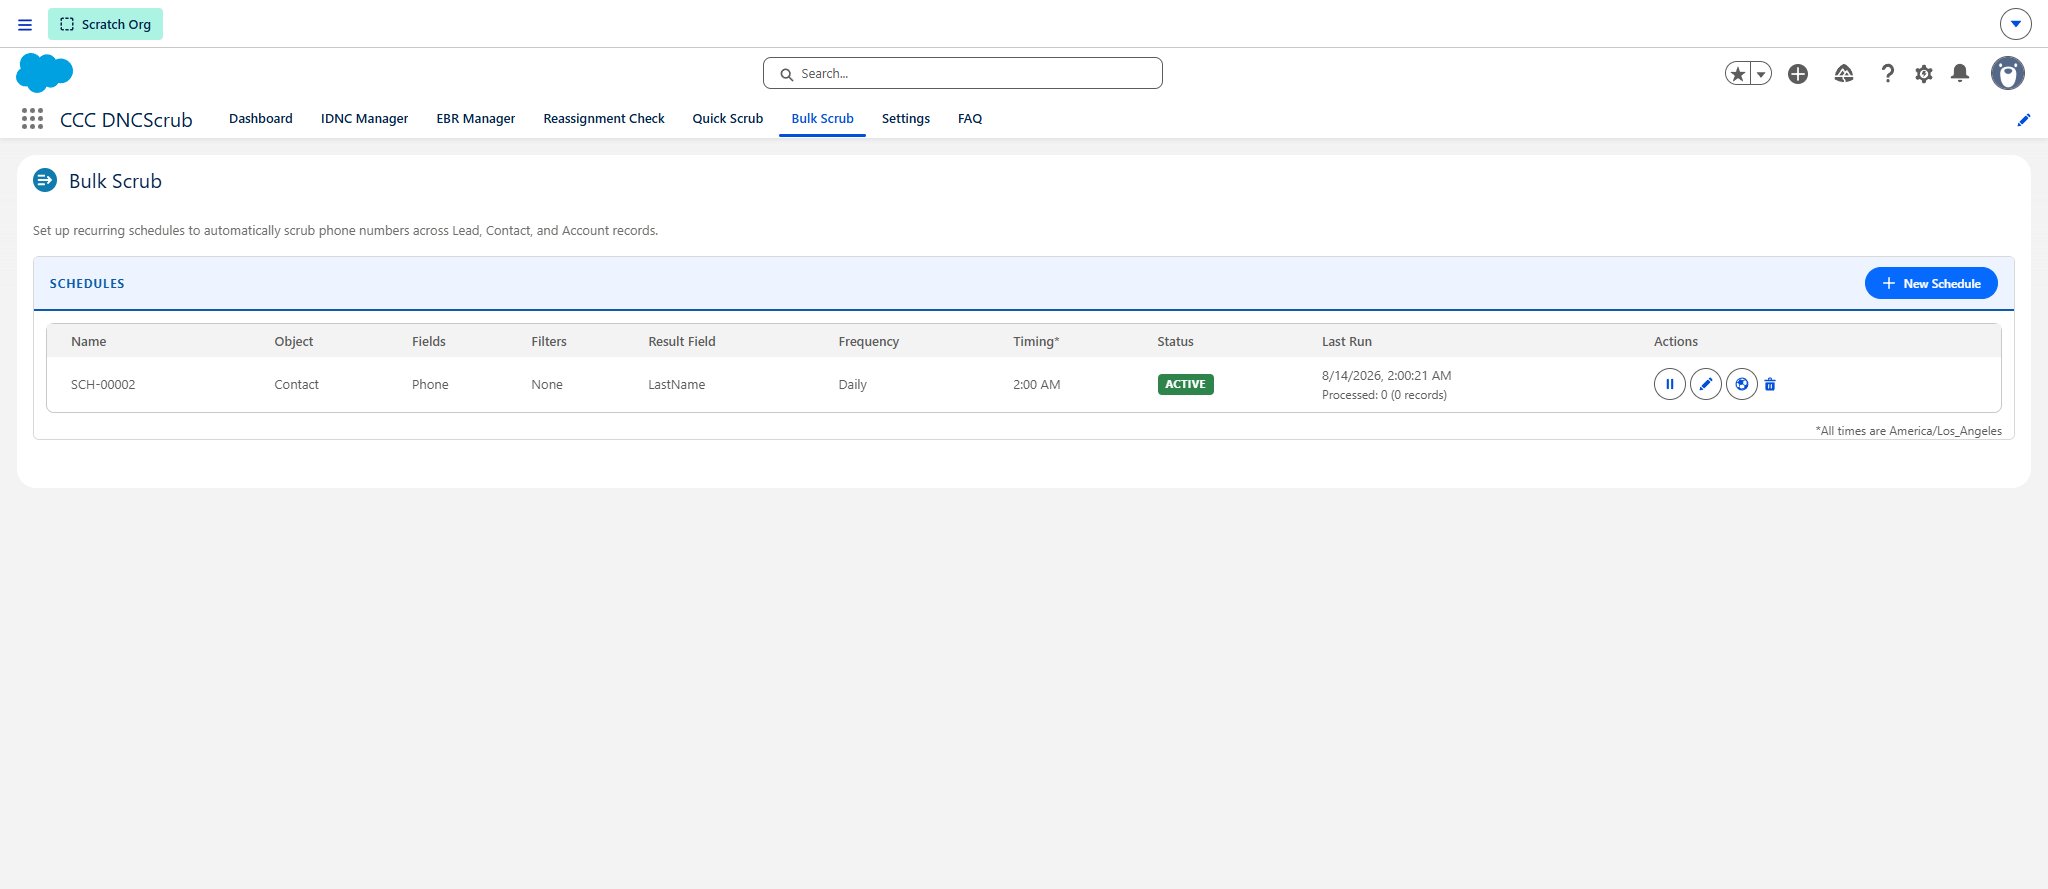
A saved daily schedule, showing its last run and how many records were processed.
How a bulk scrub runs
Start times are shown and entered in the time zone noted at the bottom of the schedule list — your Salesforce user’s time zone. When a schedule fires:1
Records are selected
All records of the chosen object that have a value in at least one of the selected phone fields, narrowed by any filters you added.By default, records scrubbed within your rescrub interval are skipped, so a daily schedule over a monthly interval only picks up what has become stale or is new. Scrub all records (not just stale) overrides this and re-scrubs everything in scope.
2
Numbers are collected and de-duplicated
Phone numbers are gathered across all selected fields and reduced to distinct numbers, so the same number appearing on several records — or written in different formats — is sent once, not once per record.
3
The API is called in batches
Records are processed in batches of 1,000, with one API call per batch of distinct numbers. Bulk scrub always calls the API rather than reading the cache, and refreshes the cached result for every number it checks.
4
Results are written back
Each record’s summary fields are updated with the worst result across its phone fields, and a Scrub Detail child record is written per phone field. If you set Save Result Code To, the raw code is copied to that field as well. Every operation is recorded in the Scrub Log.
Checking that a run worked
The schedule row shows Last Run and a summary of what happened, for exampleProcessed: 1,240 (1,240 records). The status button on the row opens the progress of the most recent batch job, including any errors.
For more detail:
- Setup → Apex Jobs shows the batch job itself, its status, and any failures.
- The Scrub Log (
CCC_Scrub_Log__c) records aBulk Scrubentry per run, andBulk Scrub Errorif a run failed.
Where Scrub Data Is Stored
Aggregate (worst-case) results are stored in custom fields on Lead, Contact, Account, and Campaign Member:
When multiple phone fields are configured, each gets its own Scrub Detail (
CCC_Scrub_Detail__c) child record tracking that field’s result code, status, line type, carrier, region, and last-scrubbed time. Every operation is also written to the Scrub Log (CCC_Scrub_Log__c) audit object.
How results are reused between scrubs
Scrub results are cached per phone number inCCC_Phone_Cache__c, so the same number is not paid for twice within your rescrub interval — even when it appears on several records, or is stored in different formats. (415) 323-0415, 415-323-0415 and 1-415-323-0415 all resolve to the same cached entry.
Bulk Scrub always calls the API and refreshes the cache; Quick Scrub, record-page scrubs and auto-scrub read from it first and only call the API when there is no unexpired entry. Each entry stores its own expiry, stamped when it was written, so changing the rescrub interval affects numbers scrubbed from then on rather than rewriting entries you already have.
The cache holds one row per distinct number and is emptied of expired rows by the daily cleanup job. It is a billing optimisation only — CCC_Scrub_Log__c remains the audit record.
Using scrub data in Salesforce
Because the CCC fields are standard custom fields, they work everywhere:- Reports & dashboards — group or filter on
CCC_Scrub_Status__cto report compliance across your database. - List views — filter to see all Do Not Call or Clean records at a glance.
- Flow / Process Builder — trigger actions when
CCC_Scrub_Status__cchanges (e.g. notify a manager when a lead is flagged as a litigator). - Validation rules — block lead conversion or activity creation when the status is Do Not Call or Litigator.
Administration Notes
- Rescrub interval — set on the Settings tab as a value plus a unit of hours, days, or months; applies org-wide to panels, Quick Scrub, and bulk operations.
- Daily cleanup job — clears expired cache entries, and old audit logs if you have set a retention period. Its status is shown on the Settings tab, with a Schedule now button if it is missing.
-
Storage — the scrub cache holds one row per distinct phone number, so it grows to roughly the number of unique numbers you scrub and then levels off.
CCC_Scrub_Log__cgrows with every scrub and is the only object without a natural ceiling; check Setup → Storage Usage periodically if you scrub at high volume. -
Remote Site Settings — three sites must be active for all features. They are included in the package; verify them under Setup → Remote Site Settings: